- Integration Guidelines
- Supported Features (Payment Methods)
- Implementing a Browser Payment Integration
- PayPal Payments
PayPal NVP Payments
PayPal is a supported browser payment method in the Mastercard Payment Gateway. This page describes integration details specific to PayPal NVP API, including how to configure your PayPal business account to accept payments via the gateway, branding requirements, etc. It's recommended that you read the integration guidelines for browser payments, before building a PayPal integration.
Prerequisites
To use PayPal as a payment method via the gateway, you must have a PayPal business account configured for the gateway. For details, see Configuring your PayPal Business Account.
To sign up for a PayPal business account, click here.
PayPal Integration
If you have an existing Hosted Checkout integration, PayPal will automatically be available once your payment service provider has successfully configured the acquirer link for PayPal.
For details, see Browser Payments via Hosted Checkout Integration.
Choose Direct Payment integration if you want to offer PayPal payment method on your own checkout page.
PayPal Checkout Experience
You can choose a checkout flow that's most suitable for your shop site.
PayPal allows your payers to quickly and securely check out on your shop site, allowing them to use their PayPal account for payment and to optionally provide shipping information to the shop site. With PayPal, payers start and end the checkout process on your shop site. Payers only need to log in to their PayPal account and confirm their shipping address and method of payment. The shop site can then retrieve the shipping information.
The gateway supports two types of PayPal checkout flows — Shortcut and Mark.
The Shortcut flow allows you to redirect the payer from your shop site to the PayPal website using a “Check Out with PayPal button placed on the shop site’s card review page. The payer bypasses the normal checkout flow and checks out using the information stored in their PayPal account. PayPal provides the name, email address, and shipping address from the payer’s account back to the shop site, allowing a faster checkout by bypassing the entry of this information on the shop site.
The Mark flow allows the payer to proceed through the normal checkout flow, entering their billing and shipping information into the shop site. When the payer is prompted to choose their payment method, the payer chooses the PayPal option placed on the shop site's billing page alongside other payment options. Unlike a shortcut transaction, the shop site provides the payer’s shipping address to PayPal.
With both Shortcut and Mark checkout flows, you can choose to display a "Pay Now" button or a "Continue" button at the PayPal website.
The "Pay Now" button allows the payer to confirm the payment on the PayPal website before being redirected back to your shop site. This option allows you to provide a faster checkout experience to the payer as the payer completes the payment at the PayPal website.
The "Continue" button allows the payer to be redirected to your shop site to confirm the payment after viewing all the order details. This option allows you to change the order if necessary before accepting the payment (for example, adding shipping and handling charges based on the address returned from PayPal). Or, you can include other checkout steps, for example, upselling on your Confirm Order page.
See Payment Confirmation below for details on how to implement this in your PayPal integration.
Depending on the checkout flow, Mark or Shortcut, you may choose to collect the payer's shipping address on your shop site or the PayPal website respectively. By default, PayPal collects the shipping address from the payer on the PayPal website, which the payer can add or edit, if necessary. You can choose not to display the shipping address and/or disable edits. See Display/Override Shipping Address below for information on how to implement this in your PayPal integration.
The example below describes the Shortcut flow where the payer uses the shipping address as stored by PayPal. The payer reviews and confirms the payment on the merchant's shop site.
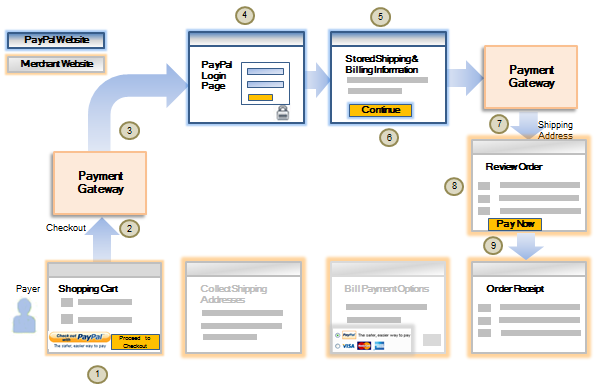
The checkout flow is as follows:
- A payer browses your shop site, selects a product and clicks Checkout with PayPal at the checkout page.
- When the payer clicks Checkout with PayPal button, you perform a
Initiate Browser Paymentcall to the gateway, and redirect the payer to the URL returned in the response. - The gateway redirects the payer to the PayPal website.
- The payer logs in to their PayPal account using the PayPal Login page.
- The payer specifies the shipping address. The payer may select a shipping address previously stored with PayPal, or enter a new one.
- The payer selects a funding source and proceeds with the payment by clicking the "Continue" button on the PayPal website.
- The payer is redirected from PayPal back to your shop site, via the gateway. You retrieve the details of the transaction, including payer's account email and shipping address, using the
Retrieve Transactionoperation. - You present a review page to the payer based on this information (for example, you may wish to add shipping and handling charges). When the payer clicks the "Pay Now" button to process the payment, you perform a
Confirm Browser Paymentcall to the gateway. - The gateway sends a response with the transaction details, which indicates the success or otherwise of the payment, so you can present the status to the payer.
Initiate Browser Payment API Reference [REST][NVP]
Direct Payment Integration
Direct Payment integration allows you to offer PayPal payment method on your own checkout page.
The following fields in the Initiate Browser Payment request are either specific to PayPal or have a specific usage in the PayPal integration. For other details, see Browser Payments via Direct Payment Integration.
sourceOfFunds.type = PAYPAL-
With PayPal, the authorization expires within 3 days from the time the authorization occurred. If you still wish to capture the funds after the expiry of the authorization, you can use the Update Authorization operation.
By default, your PayPal merchant account is configured for single captures only. If you wish to change the configuration to support multiple captures, please contact PayPal. -
When initiating a PayPal payment, you must specify if you want the payer to confirm the payment on the PayPal website or your shop site.
Payment Confirmation Field API Reference [REST][NVP]
If confirming at the provider (PayPal), the PayPal website displays a "Pay Now" button, which allows the payer to confirm the payment on the PayPal website before being redirected to your shop site. You must send a
Retrieve Transactionrequest to the gateway to determine the success or otherwise of the payment.If confirming on your shop site, the PayPal website displays a "Continue" button, which allows the payer to be redirected to your shop site where the payer can confirm the payment. You must send a
Retrieve Transactionrequest to the gateway to retrieve details on whether the payer has continued with the payment or not. If the payer continues with the payment on your shop site, you need to send aConfirm Browser Paymentcall to confirm the payment with PayPal. TheConfirm Browser Paymentresponse will contain information about the success or otherwise of the payment.Confirm Browser Payment API Reference [REST][NVP]
In both cases, if the payment is successful the Retrieve Transaction returns:
- the email address on the payer's PayPal account
- the account holder name on the payer's PayPal account
- the shipping address details
-
You can manage how the payer provides you a shipping address using two fields:
browserPayment.paypal.displayShippingAddress— when set to true (default), the shipping address is displayed on the PayPal website.browserPayment.paypal.overrideShippingAddress— when set to true (default), the payer can change the shipping address on the PayPal website.
By default, PayPal collects the shipping address from the payer on the PayPal website for you. If you choose to collect the shipping address from the payer on your shop site, and you do not want PayPal to display the shipping address to the payer, you must set
browserPayment.paypal.displayShippingAddressto false. This also applies when a shipping address is not required for an order (for example, digital products only).The gateway will always return the shipping address in the
Retrieve Transactionresponse if the address was supplied in theInitiate Browser Paymentrequest or ifbrowserPayment.paypal.displayShippingAddressis set to true.See table below for the various scenarios that may be applicable to your integration. You can choose a different scenario for each payment.
Initiate Browser Payment PayPal Website Display Shipping Address Override Shipping Address Is the Shipping Address required? Is the Shipping Address supplied? Is the Shipping Address valid? Is the Shipping Address displayed to payer? Source of the displayed Shipping Address Can the payer change the Shipping Address? true (default) true (default) optional no NA yes PayPal collects the shipping address. yes true (default) true (default) optional yes yes yes PayPal displays the shipping address you provide in the request on the PayPal website. yes true (default) true (default) optional yes no yes PayPal ignores the shipping address you provide in the request instead collects the shipping address on the PayPal website. yes true (default) false required yes yes yes PayPal displays the shipping address you provide in the request on the PayPal website. no true (default) false required yes no no PayPal rejects the request. Not applicable false Not applicable Not applicable yes yes no PayPal ignores the shipping address you provide in the request. no false Not applicable Not applicable Not applicable Not applicable no PayPal does not have a shipping address to display. Not applicable For all scenarios, you should use the shipping address returned in the transaction response in case the shipping address was changed by the payer at the PayPal website. Please note that PayPal validates city, state, zip code combinations for U.S. shipping addresses. -
You can specify line item details in the
Initiate Browser Paymentrequest to provide payers with all the order details before they confirm the payment. Consumer research shows that more buyers complete purchases when they see the individual items and other details of an order during PayPal checkout. Hence, it's recommended that you provide order information when you initiate a PayPal checkout to encourage payers to continue with the payment rather than dropping out.Line items are considered provided if the item name or unit price is specified.
For more information on line item details, see Line Item Data.
How to Interpret the Transaction Result
The table below shows the transaction response codes for the possible scenarios you may encounter after initiating a browser payment.
Initiate Browser Payment Response |
What This Means... |
|---|---|
response.gatewayCode=SUBMITTEDresult=SUCCESS |
Redirect the payer using the URL provided in the response. |
response.gatewayCode=SUBMITTEDresult=FAILURE or PENDING or UNKNOWN |
Submit another INITIATE_BROWSER_PAYMENT request. |
Retrieve Transaction/Retrieve Order Response |
What This Means... |
response.gatewayCode=APPROVEDresult=SUCCESS |
The payment is successful. |
response.gatewayCode=PENDINGresult=PENDING |
The payment is pending a review in the PayPal system. The status of the payment will be updated by the gateway as soon as the PayPal system has informed the gateway about the result of the review. See Pending Payments. |
response.gatewayCode=CANCELLEDresult=FAILURE |
The payer has cancelled the interaction for this payment. Offer the payer the option to try another payment method. |
response.gatewayCode=DECLINED or INSUFFICIENT_FUNDS or NOT_SUPPORTEDresult=FAILURE |
The payment was declined by PayPal. |
response.gatewayCode=ACQUIRER_SYSTEM_ERRORresult=FAILURE |
The acquirer was unable to process the transaction. You may want to inquire with the acquirer the reason for payment failure, or you can try RETRIEVE_TRANSACTION again. Or, you can offer the payer the option to try another payment method. |
response.gatewayCode=SYSTEM_ERRORresult=FAILURE |
The gateway was unable to process the transaction. |
response.gatewayCode=TIMED_OUTresult=FAILURE |
The interaction between the payer and the PayPal system was not successfully completed, for example, the gateway did not receive a redirect of the payer's browser from the merchant within 24 hours or the gateway was unable to retrieve the interaction details between the payer and the PayPal system hence the payment is incomplete. |
response.gatewayCode=UNKNOWNresult=UNKNOWN |
The gateway was unable to find out about the success or otherwise of the payment. |
Pending Payments
In some cases, the gateway may return a status of PENDING in the transaction response. For example, if the transaction is currently under risk assessment at PayPal. If the status is pending and if you have configured your own fraud management filters, you should log on to your PayPal business account and review the payment.
PayPal will notify the gateway when the status of a pending transaction is updated by PayPal. You can retrieve the result of the updated transaction using the Retrieve Transaction operation.
The gateway considers a PENDING transaction as successful until a notification is received about the success or otherwise of the transaction. The order totals (total authorized/captured/refunded amounts) are updated by taking into account the pending transactions. If the transaction is declined, the updates are reversed.
Refunding PayPal Payments
You can refund payments processed via PayPal in part, full, or excess; however, please note that the refund amount only applies to the specific Capture transaction you wish to refund against, and not the total authorized amount. For example, if an authorization for 100 USD is followed by two partial captures for 30 USD (Capture 1) and 70 USD (Capture 2) then any refunded amount on this order, part, full, or excess, applies individually on Capture 1 or Capture 2 and not the total order amount of 100 USD. This is to say that a refund for 50 USD on Capture 1 and Capture 2 is considered excessive and partial respectively.
- API and the refund amount (inclusive of the attempted refund) must not exceed the captured amount by more than the maximum excess amount permitted.
- PayPal, if not the PayPal acquirer rejects the request.
Branding Requirements for your Shop Site
This section helps you configure your checkout pages in order to comply with PayPal's branding requirements.
When you offer PayPal as a payment method to your payers, it's important to ensure that the payer's checkout experience meets or exceeds best practice checkout implementation standards outlined by PayPal.
To provide a more seamless experience for your payers, the gateway recommends that you customize your PayPal payment pages. To do this:
- Log in to your PayPal account (at https://www.paypal.com).
- Determine whether you are using PayPal Merchant Manager. To do this, look at the URL in your browser's address bar. If the URL starts with https://paypalmanager.paypal.com/, you are using PayPal Merchant Manager.
- If you are using PayPal Merchant Manager:
- Click Profile.
- Under Hosted payment settings, click Custom page styles.
- If you are not using PayPal Merchant Manager:
- Under Profile, click My Selling Tools.
- Under Selling online, click the Update link to the right of Custom payment pages.
- If you are using PayPal Merchant Manager:
For guidelines on how to present the user interface elements in your checkout pages, see Express Checkout User Interface Standards Guide on the PayPal website.
Configuring your PayPal Business Account
This section describes how to configure your PayPal business account to work with the gateway integration.
To process transactions through PayPal, you must grant permissions to the gateway for the specific API calls that the gateway must make on your behalf.
To do this:
- Log in to your PayPal business account (at https://www.paypal.com).
- Determine whether you are using PayPal Merchant Manager. To do this, look at the URL in your browser's address bar. If the URL starts with https://paypalmanager.paypal.com/ you are using PayPal Merchant Manager.
- If you are using PayPal Merchant Manager:
- Click Profile.
- Under Account information, click Request API credentials.
- Click Set up PayPal API credentials and permissions.
- If you are not using PayPal Merchant Manager:
- Under Profile, click My Selling Tools.
- Under Selling online, click the Update link to the right of API access.
- In the Option 1 box, there will be a link that says Grant API permission or Add or edit API permissions.
- If the link says Grant API permission, click it.
- If the link says Add or edit API permissions, click it, then click Add New Third Party.
- In the Third Party Permission Username box, enter the API username provided by Mastercard and click Lookup. The API username will be provided in the merchant setup email sent by Mastercard.
- In the Available Permissions section, click the following checkboxes:
- Use Express Checkout to process payments.
- Issue a refund for a specific transaction.
- Authorize and capture your PayPal transactions.
- Click Add.
You need to provide your payment service provider with the email address of your PayPal business account.
Using these details, your payment service provider will complete the configuration. Once your integration with the gateway for PayPal is complete, you can initiate a browser payment with PAYPAL as the payment type. Depending on your integration, you may have to provide some fields specific to PayPal, which are listed in the following section.
Testing Your Integration
The gateway provides a PayPal Emulator that allows you to test your integration for using the PayPal functionality via the gateway.